Universal Analytics is out of beta and Google is rolling out the upgrade across accounts. If you want to ensure the switch over is on your schedule then don’t wait to be pushed.
Here’s how to upgrade to Universal Analytics
- Log into your Google Analytics account
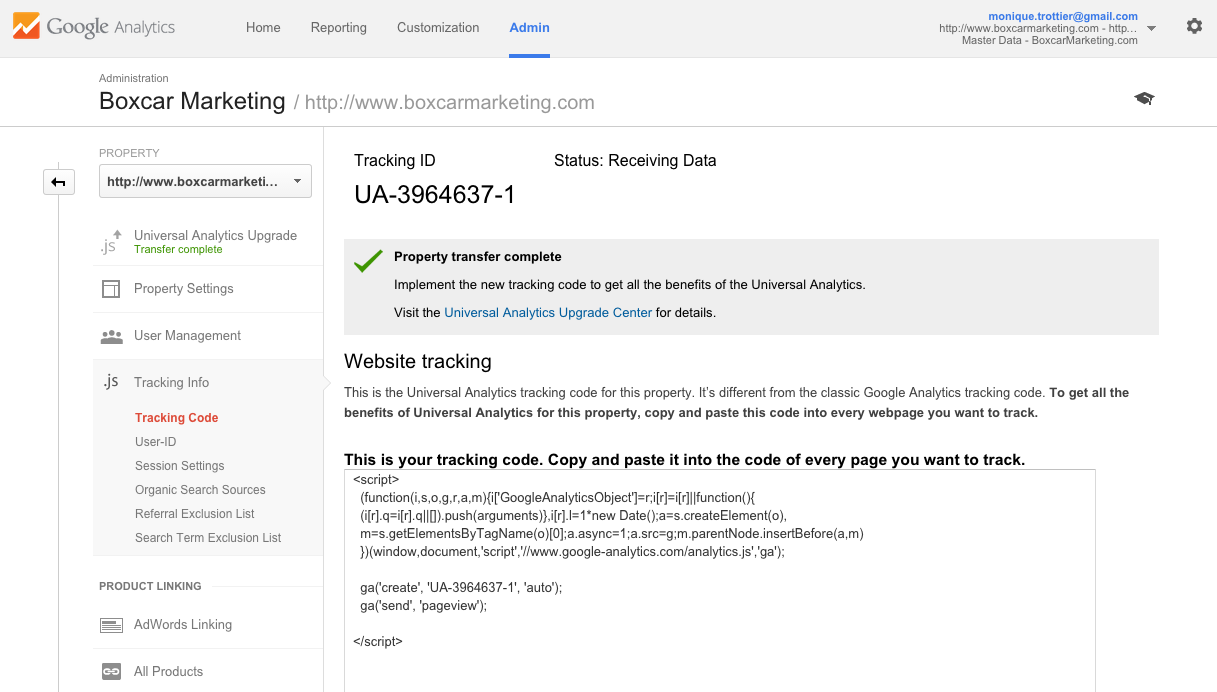
- Get the new tracking code by clicking Admin in the top menu and selecting Tracking Info from the Property column
- Replace the existing code on all your webpages with the new code.
How to find the Tracking Code:
![]()
TIP #1: Make sure you put the Universal Analytics code into the head section. Years ago, the instructions were to place the code before the close of the body section. It has to go in the head section now otherwise you can’t take advantage of many of the tracking features, including Google Tag Manager.
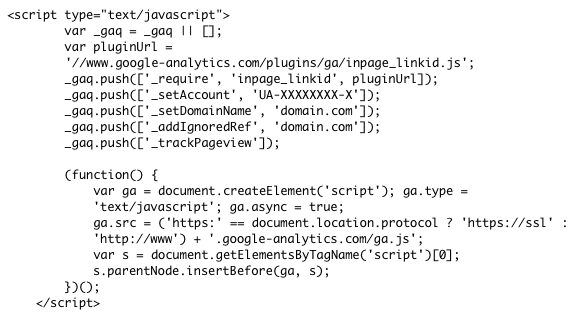
Example of Old Code for Google Analytics:

Example of New Code for Universal Analytics (and where to find it in Analytics):

TIP #2: Google’s upgrade instructions are outdated. They mention a two step process. If your Tracking Info indicates that this is the Universal Analytics code, you can skip Step 1 because your account has already been upgraded. If you see the old code still, then there should be a “Universal Analytics Upgrade” button.
See the Google Developer’s Guide to Upgrading
What To Do Next
- Ensure Webmaster Tools is still tracking.
- Take Advantage of New Features like Custom Variables and Custom Dimensions (more on this in a future newsletter)
- Switch over event tracking codes to Tag Manager.
Using Google Tag Manager for Event Tracking
Tag Manager is a bit confusing at first but it’s also auto-magical in that you no longer have to add JavaScript to track things like PDF downloads, outbound link clicks and other user actions.
Here’s how it works: You need a tag that listens, a tag that captures the data, and a tag that collects (or pushes) that info to Google Analytics. For example, you create a tag that “listens” for a click, captures that info and then displays it under the Event tracking section of Google Analytics.
Justin Cutroni has an in-depth article on how Tag Manager works, with examples.
Setting Up Tag Manager
- Log into Tag Manager
- Click New Account and set up the Account Name (Your Website) and container (yoursite.com).
- Install the tag manager code on all pages of your website after the opening body tag.
- In Tag Manager, select the container and click New Tag
- As a start, create tags for tracking outbound link clicks, form submissions and PDF downloads
- Publish your tags
- Confirm the data is tracking in Analytics.
- Remove any old event tracking tags from your webpages.
TIP #3: If you’ve set up everything correctly in Tag Manager and the data is not appearing in Analytics, make sure you “Publish” the tags. I often forget this step.
The Justin Cutroni article mentioned above provides setup examples for common tags.
Or hire Boxcar Marketing: we have a migration package for under $500 that is suitable for most websites. Contact Monique for details.


